Performing a Clean Install of Windows 11


1. Make sure your computer is on and the Windows desktop is running.
2. Insert the bootable USB drive into an open USB port on your computer.
3. In Windows 10 Click the Start button and then click the Power icon so you can see the Shutdown options. If you're running Windows 11 right-click on the start button and choose shutdown/sign out.
4. Press and hold the Shift key, then click "Restart."
5. Your computer will shut down, and when it restarts, you'll see the Advanced Startup Options screen. Choose "Use a device."
After you start the installer from the USB drive, select a language, and click Next. Pick the version of Windows 11 you want to install (normally Professional).
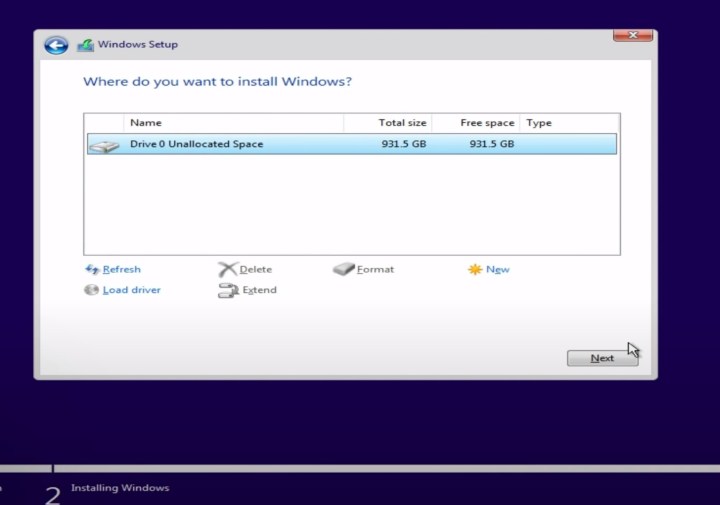
Choose the Custom option and choose the drive to install Windows 11 on. You might have to click the Format button to erase all your files on the drive, or use the Delete function to remove any existing entries so the drive is blank. When done, select the drive again and click Next.
Related Articles
OneDrive - Sharing a File or Folder in Windows
You must have a OneDrive account setup on your computer in order to share files and folders through OneDrive. 1) Open your OneDrive folder in File Explorer and locate the file or folder you want to share. 2) Right-click the file or folder and select ...How to Add an Email To Outlook for Windows
How to Update OSX on your Mac
Use Software Update to get updates Software Update finds, downloads, and installs Apple software updates and upgrades that are compatible with your Mac model. Open Software Update: Use Spotlight in the menu bar to search for "Software Update," then ...Setting Up Outlook on Your Mobile Device
Outlook - How to Setup on a Mobile Device This guide will walk you through setting up the Outlook mobile app on your device. 1 Install the Outlook mobile app The first step is to install the Outlook mobile app on your mobile device. If you have an ...Taking a Screen Shot with the Snipping Tool
Open Snipping Tool and take a screenshot in Windows 10/11 Press Windows logo key + Shift + S. The desktop will darken while you select an area for your screenshot. Rectangular mode is selected by default. You can change the shape of your snip by ...